Continuous Deployment for Python/Tornado with Jenkins, Selenium and PhantomJS

The purpose of Continuous Deployment is to increase Quality and Efficiency,
see e.g. The Software Revolution behind Linkedin’t Gushing Profits or read on

This posting presents an overview of Atbrox’ ongoing work on Automated Continuous Deployment. We develop in several languages depending on project or product, e.g. C/C++ (typically with SWIG combined with Python, or combined with Objective C), C# , Java (typically Hadoop/Mapreduce-related) and Objective-C (iOS). But most of our code is in Python (together with HTML/Javascript for frontends and APIs) and this posting will primarily show Python-centric continuous deployment with Jenkins (total flow) and also some more detail on the testing Tornado apps with Selenium.


Continuous Deployment of a Python-based Web Service / API

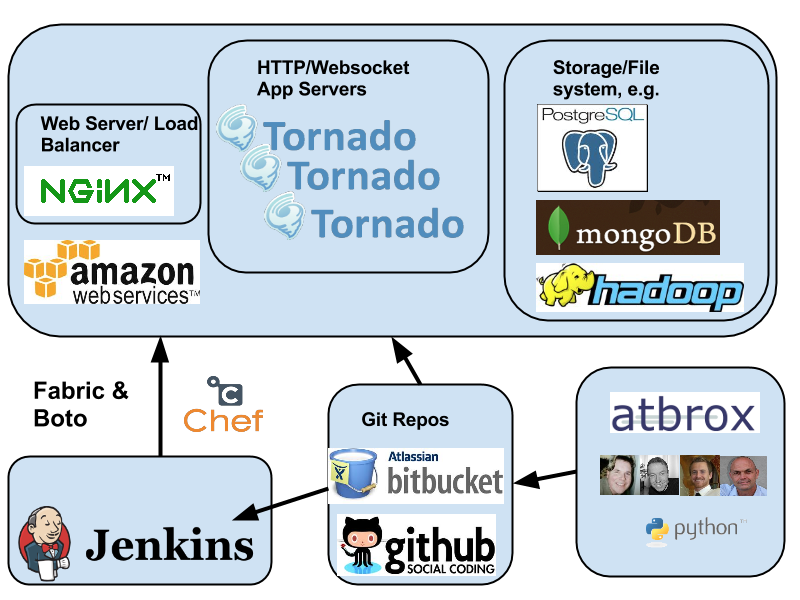
Many of the projects we develop involve creating a HTTP/REST or websocket API that generically said “does something with data” and has a corresponding UI in Javascript/HTML. The typical building stones of such a service is shown in the figure:

The flow is roughly as follows

  1. An Atbrox developer submits code into a git repo (e.g. Bitbucket.org or Github.com repo)
  2. Jenkins picks up the change (by notification from git or by polling)
  3. Tests are run, e.g.
    py.test -v --junitxml=result.xml --cov-report html --cov-report xml --cov .
    
    1. Traditional Python unit tests
    2. Tornado web app asynchronous tests – http://www.tornadoweb.org/en/stable/testing.html
    3. Selenium UI Tests (e.g. with PhantomJS or xvfb/pyvirtualdisplay)
    4. Various metrics, e.g. test coverage, lines of code (sloccount), code duplication (PMD) and static analysis (e.g. pylint or pychecker)
  4. If tests and metrics are ok:
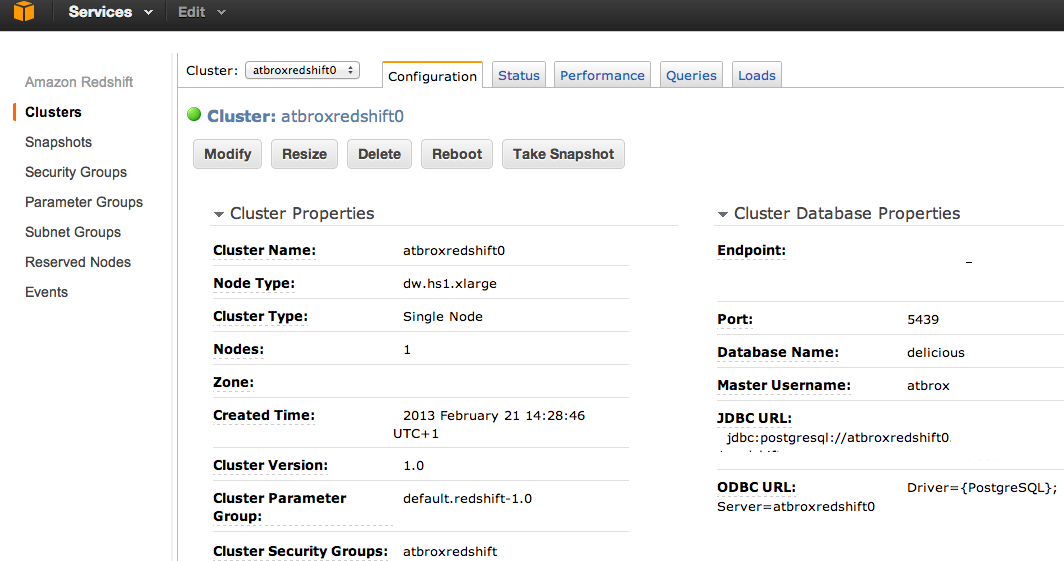
    1. provision cloud virtual machines (currently AWS EC2) if needed with fabric and boto, e.g.
      fab service launch
      
    2. deploy to provisioned or existing machines with fabric and chef (solo), e.g.
      fab service deploy
      
  5. Fortunately Happy customer (and atbrox developer). Goto 1.

Example of selenium test of Tornado Web Apps with PhantomJS

Tornado is a python-based app server that supports Websocket and HTTP (it was originally developed by Bret Taylor while he was a FriendFeed). In addition to the python-based tornado apps you typically write a mix of javascript code and html templates for the frontend. The following example shows how to selenium tests for Tornado can be run:

Utility methods for starting a Tornado application and pick a port for it

import os
import tornado.ioloop
import tornado.httpserver
import multiprocessing


def create_process(port, queue, boot_function, application, name, 
                    instance_number, service, 
                    processor=multiprocessing):
    p = processor.Process(target=boot_function, 
                          args=(queue, port, 
                               application, name,
                               instance_number, service))
    p.start()
    return p

def start_application_server(queue, port, application, name, 
                             instance_number, service):
    http_server = tornado.httpserver.HTTPServer(application)
    http_server.listen(port)
    actual_port = port
    if port == 0: # special case, an available port is picked automatically
        # only pick first! (for now)
        assert len(http_server._sockets) > 0
        for s in http_server._sockets:
            actual_port = http_server._sockets[s].getsockname()[1]
            break
    pid = os.getpid()
    ppid = os.getppid()
    print "INTERNAL: actual_port = ", actual_port
    info = {"name":name, "instance_number": instance_number, 
            "port":actual_port,
            "pid":pid, 
            "ppid": ppid, 
            "service":service}
    queue.put_nowait(info)
    tornado.ioloop.IOLoop.instance().start()

Example Tornado HTTP Application Class with an HTML form

# THE TORNADO CLASS TO TEST
class MainHandler(tornado.web.RequestHandler):
    def get(self):
        html = """
<html>
<head><title>form title</title></head>
<body>
<form name="input" action="http://localhost" method="post" id="formid">
Query: <input type="text" name="query" id="myquery">
<input type="submit" value="Submit" id="mybutton">
</form>
</body>
</html>
"""
        self.write(html)

    def post(self):
        self.write("post returned")

Selenium unit test for the above Tornado class


class MainHandlerTest(unittest.TestCase):                                                                                        
    def setUp(self):                                                                                                             
        self.application = tornado.web.Application([                                                                             
            (r"/", MainHandler),                                                                                                 
            ])                                                                                                                   
                                                                                                                                 
        self.queue = multiprocessing.Queue()                                                                                                                                                                                                        
        self.server_process = create_process(0,self.queue,start_application_server,self.application,"mainapp", 123, "myservice") 
        self.driver = webdriver.PhantomJS('/usr/local/bin/phantomjs')                                                            
                                                                                                                                 
    def testFormSubmit(self):                                                                                                    
        data = self.queue.get()                                                                                                  
        URL = "http://localhost:%s" % (data['port'])                                                                             
        self.driver.get('http://localhost:%s' % (data['port']))                                                                  
        assert "form title" in self.driver.title                                                                                 
        element = self.driver.find_element_by_id("formid")      
        # since port is dynamically assigned it needs to be updated with the port in order to work                                                         
        self.driver.execute_script("document.getElementById('formid').action='http://localhost:%s'" % (data['port']))            
                                                                                                                                 
        # send click to form and receive result??                                                                                
        self.driver.find_element_by_id("myquery").send_keys("a random query")                                                    
        self.driver.find_element_by_id("mybutton").click()                                                                       
        assert 'post returned' in self.driver.page_source                                                                        
                                                                                                                                 
                                                                                                                                 
    def tearDown(self):                                                                                                          
        self.driver.quit()                                                                                                       
        self.server_process.terminate()                                                                                          
                                                                                                                                 
                                                                                                                                 
if __name__ == "__main__":                                                                                                       
    unittest.main(verbosity=2)                                                                                                   
                                                                                                                                 

Conclusion
The posting have given and overview of Atbrox’ (in-progress) Python-centric continuous deployment setup, with some more details how to do testing of Tornado web apps with Selenium. There are lots of inspirational and relatively recent articles and presentations about continuous deployment, in particular we recommend you to check out:

  1. Etsy’s slideshare about continuous deployment and delivery
  2. the Wired article about The Software Revolution Behind LinkedIn’s Gushing Profits
  3. Continuous Deployment at Quora

Please let us know if you have any comments or questions (comments to this blog post or mail to info@atbrox.com)

Best regards,
The Atbrox Team

Side note: We’re proponents and bullish of Python and it is inspirational to observe the trend that several major Internet/Mobile startups/companies are using it for their backend development, e.g. Instagram, Path, Quora, Pinterest, Reddit, Disqus, Mozilla and Dropbox. The largest python-based backends probably serve more traffic than 99.9% of the world’s web and mobile sites, and that is usually sufficient capability for most projects.

Posted in cloud computing, continuous deployment, infrastructure, tracer bullet development | Tagged , , | Leave a comment

Combining Hadoop/Elastic Mapreduce with AWS Redshift Data Warehouse

There are currently interesting developments of scalable (up to Petabytes), low-latency and affordable datawarehouse related solutions, e.g.

  1. AWS Redshift (cloud-based) [1]
  2. Cloudera’s Impala (open source) [2,3]
  3. Apache Thrill (open source) [4]

This posting shows how one of them – AWS Redshift – can be combined with Hadoop/Elastic mapreduce for processing of semi/unstructured data.

1. Processing of structured vs unstructured/semistructured data


A good gold mine has 8-10 grams of gold per ton of gold ore (i.e. 0.008-0.01%), the amount of structured (“gold”) vs unstructured data (“gold ore”) is not that dissimilar (probably between 0.01-10% in many cases)
What is common for the solutions above is that they are primarily targeted towards efficient processing of structured data – as opposed to un/semi-structured data. This posting gives a simple integration example of how Elastic Mapreduce/Hadoop can be used to preprocess data into structured data that can be easily imported into and analyzed with AWS Redshift.

In the general case – and not the simplistic json data used in this example – Mapreduce algorithms could be used to process any type of input un/semi-structured data (e.g. video, audio, images and text) and where fit produce structured data that can be imported into Redshift. See my O’Reilly Strata Presentation – Mapreduce Algorithms – for more examples/pointers about capabilities of Mapreduce [5].

2. Processing input data with Elastic Mapreduce/Hadoop and import results to Redshift

The input data used in this example is parts of the the del.icio.us bookmarking data set collected (crawled) by Arvind Naraynanan (CS Professor at University of Princeton) [6,7]. Since the main purpose of this is to show integration between Mapreduce and Redshift the example is rather simple:

  1. the mapper function processes individual json del.icio.us records and produces records that contains some basic stats about tag lengths used in bookmarks,
  2. the reducer just writes out the results as tab-separated files on AWS S3.
  3. Finally the Mapreduce output is imported into AWS Redshift where further query-based analytics can begin.

3. Example input JSON record

{
    &quot;author&quot;: &quot;linooliveira&quot;,
    &quot;comments&quot;: &quot;http://delicious.com/url/0001c173b0f84ea81d188336223f9d7d&quot;,
    &quot;guidislink&quot;: false,
    &quot;id&quot;: &quot;http://delicious.com/url/0001c173b0f84ea81d188336223f9d7d#linooliveira&quot;,
    &quot;link&quot;: &quot;http://www.amadeus.net/plnext/meb/HomePageDispatcher.action?SITE=BCEUBCEU&amp;LANGUAGE=GB&quot;,
    &quot;links&quot;: [
        {
            &quot;href&quot;: &quot;http://www.amadeus.net/plnext/meb/HomePageDispatcher.action?SITE=BCEUBCEU&amp;LANGUAGE=GB&quot;,
            &quot;rel&quot;: &quot;alternate&quot;,
            &quot;type&quot;: &quot;text/html&quot;
        }
    ],
    &quot;source&quot;: {},
    &quot;tags&quot;: [
        {
            &quot;label&quot;: null,
            &quot;scheme&quot;: &quot;http://delicious.com/linooliveira/&quot;,
            &quot;term&quot;: &quot;trips&quot;
        },
        {
            &quot;label&quot;: null,
            &quot;scheme&quot;: &quot;http://delicious.com/linooliveira/&quot;,
            &quot;term&quot;: &quot;howto&quot;
        },
        {
            &quot;label&quot;: null,
            &quot;scheme&quot;: &quot;http://delicious.com/linooliveira/&quot;,
            &quot;term&quot;: &quot;tips&quot;
        },
        {
            &quot;label&quot;: null,
            &quot;scheme&quot;: &quot;http://delicious.com/linooliveira/&quot;,
            &quot;term&quot;: &quot;viagens&quot;
        }
    ],
    &quot;title&quot;: &quot;Flight Times, Flight Schedules, Best fares, Best rates, Hotel Rooms, Car Rental, Travel Guides, Trip Planning - Amadeus.net&quot;,
    &quot;title_detail&quot;: {
        &quot;base&quot;: &quot;http://feeds.delicious.com/v2/rss/recent?min=1&amp;count=100&quot;,
        &quot;language&quot;: null,
        &quot;type&quot;: &quot;text/plain&quot;,
        &quot;value&quot;: &quot;Flight Times, Flight Schedules, Best fares, Best rates, Hotel Rooms, Car Rental, Travel Guides, Trip Planning - Amadeus.net&quot;
    },
    &quot;updated&quot;: &quot;Sun, 06 Sep 2009 11:36:20 +0000&quot;,
    &quot;wfw_commentrss&quot;: &quot;http://feeds.delicious.com/v2/rss/url/0001c173b0f84ea81d188336223f9d7d&quot;
}

4. Example of output TSV record produced by Mapreduce

# fields: id, weekday, month, year, hour, minute, second, num_tags, sum_tag_len, avg_tag_len, num_tags_with_len0,num_tags_with_len1,.., num_tags_with_len9


http://delicious.com/url/0001c173b0f84ea81d188336223f9d7d#linooliveira Sun Sep 2009 11 36 20 4 21.0 5.25 0 0 0 0 1 2 0 1 0 0

5. Elastic Mapreduce/Hadoop code in Python

Probably one of the easiest ways to use Elastic Mapreduce is to write the mapreduce code in Python using Yelp’s (excellent) mrjob [8]. And there are of course plenty of reasons to choose Python as the programming language, see [9-14].

from mrjob.job import MRJob
from mrjob.protocol import RawProtocol
import json
import sys
import logging

class PreprocessDeliciousJsonMapreduce(MRJob):
    INPUT_PROTOCOL = RawProtocol # mrjob trick 1
    OUTPUT_PROTOCOL = RawProtocol # mrjob trick 2

    def calc_tag_stats(self, jvalue):
        tag_len_freqs = {}
        num_tags = len(jvalue[&quot;tags&quot;])
        sum_tag_len = 0.0
        for taginfo in jvalue[&quot;tags&quot;]:
            tag_len = len(taginfo[&quot;term&quot;])
            if tag_len &lt; 10: # only keep short tags
                sum_tag_len += tag_len
                tag_len_freqs[tag_len] = tag_len_freqs.get(tag_len, 0) + 1
        for j in range(10):
            if not tag_len_freqs.has_key(j):
                tag_len_freqs[j] = 0 # fill in the blanks
        avg_tag_len = sum_tag_len / num_tags
        return avg_tag_len, num_tags, sum_tag_len, tag_len_freqs

    def get_date_parts(self, jvalue):
        (weekday, day, month, year, timestamp) = jvalue[&quot;updated&quot;].replace(&quot;,&quot;, &quot;&quot;).split(&quot; &quot;)[:5]
        (hour, minute, second) = timestamp.split(':')[:3]
        return hour, minute, month, second, weekday, year

    def mapper(self, key, value):
        try:
            jvalue = json.loads(key)
            if jvalue.has_key(&quot;tags&quot;):
                avg_tag_len, num_tags, sum_tag_len, tag_len_freqs = self.calc_tag_stats(jvalue)
                hour, minute, month, second, weekday, year = self.get_date_parts(jvalue)

                out_data = [weekday, month, year, hour,minute,second, num_tags, sum_tag_len, avg_tag_len]

                for tag_len in sorted(tag_len_freqs.keys()):
                    out_data.append(tag_len_freqs[tag_len])

                str_out_data = [str(v) for v in out_data]

                self.increment_counter(&quot;mapper&quot;, &quot;kept_entries&quot;, 1)

                yield jvalue[&quot;id&quot;], &quot;\t&quot;.join(str_out_data)
        except Exception, e:
            self.increment_counter(&quot;mapper&quot;, &quot;skipped_entries&quot;, 1)
            logging.error(e)

    def reducer(self, key, values):
        for value in values:
            yield key, value

    def steps(self):
        return [self.mr(mapper=self.mapper,
                        reducer=self.reducer),]

if __name__ == '__main__':
    PreprocessDeliciousJsonMapreduce.run()

6. Running the Elastic Mapreduce job

Assuming you’ve uploaded the del.icio.us (or other) data set to s3, you can start the job like this (implicitly using mrjob)


#!/bin/bash

# TODO(READER): set these variables first
export AWS_ACCESS_KEY_ID=
export AWS_SECRET_ACCESS_KEY=
export INPUT_S3=”s3://somes3pathhere”
export LOG_S3=”s3://another3pathhere”
export OUTPUT_S3=”s3://someothers3pathhere”

nohup python mapreduce_delicious.py --ssh-tunnel-to-job-tracker --jobconf mapreduce.output.compress=true --ssh-tunnel-is-closed --ec2-instance-type=m1.small --no-output --enable-emr-debugging --ami-version=latest --s3-log-uri=${LOGS_S3} -o ${OUTPUT_S3} -r emr ${INPUT_S3} --num-ec2-instances=1 &amp;

note: for larger data sets you probably want to use other instance types (e.g. c1.xlarge) and a higher number of instances.

7. Connecting, Creating Tables and Importing Mapreduce Data with AWS Redshift

There are several ways of creating and using a Redshift cluster, for this example I used the AWS Console [15], but for an automated approach using the Redshift API would be more approriate (e.g. with boto [16,17])


AWS Redshift Web Console
When you have created the cluster (and given access permissions to the machine you are accessing the Redshift cluster the from), you can access the Redshift cluster e.g. using a Postgresql Client – as below:

psql -d &quot;[your-db-name]&quot; -h &quot;[your-redshift-cluster-host]&quot; -p &quot;[port-number]&quot; -U &quot;[user-name]&quot;

and login with password and then you should be connected.

Creating table can e.g. be done with

CREATE TABLE deliciousdata (
       id varchar(255) not null distkey,
       weekday varchar(255),
       month varchar(255),
       year varchar(255),
       hour varchar(255),
       minute varchar(255),
       second varchar(255),
       num_tags varchar(255),
       sum_tag_len varchar(255),
       avg_tag_len varchar(255),
       num_tags_with_len0 varchar(255),
       num_tags_with_len1 varchar(255),
       num_tags_with_len2 varchar(255),
       num_tags_with_len3 varchar(255),
       num_tags_with_len4 varchar(255),
       num_tags_with_len5 varchar(255),
       num_tags_with_len6 varchar(255),
       num_tags_with_len7 varchar(255),
       num_tags_with_len8 varchar(255),
       num_tags_with_len9 varchar(255)
);

And data can be imported by substituting the values used the export statements earlier in the blog post (i.e. OUTPUT_S3, AWS_ACCESS_KEY_ID and AWS_SECRET_ACCESS_KEY) in the copy-command below.


copy deliciousdata from 'OUTPUT_S3/part-00000' CREDENTIALS 'aws_access_key_id=AWS_ACCESS_KEY_ID;aws_secret_access_key=AWS_SECRET_ACCESS_KEY' delimiter '\t';

8. Analytics with AWS Redshift

If everything went well, you should now be able to do SQL-queries on the data you produced with mapreduce now stored in Redshift, e.g.

select count(*) from deliciousdata;

Since this posting is about integration I leave this part as an exercise to the reader..

9. Conclusion

This posting has given an example how Elastic Mapreduce/Hadoop can produce structured data that can be imported into AWS Redshift datawarehouse.

Redshift Pricing Example
But since Redshift is a cloud-based solution (i.e. with more transparent pricing than one typically find in enterprise software) you probably wonder what it costs? If you sign up for a 3 year reserved plan with 16TB of storage (hs1.8xlarge), the efficient annual price per Terabyte is $999[1], but what does this mean? Back in 2009 Joe Cunningham from VISA disclosed[18] that they had 42 Terabytes that covered 2 years of raw transaction logs. if one assumes that they would run this on Redshift on 3 hs1.8xlarge instances on a 3 year reserved plan (with 3*16 = 48 TB available storage), the efficient price would be 48*999 = 47.9K$ per year. Since most companies probably have less amounts of structured data than VISA this amount is perhaps an upper bound for most companies?

For examples other Data Warehouse prices check out this blog post (covers HANA, Exadata, Teradata and Greenplum)[19]

Best regards,
Amund Tveit
Atbrox

A. References

[1] http://aws.typepad.com/aws/2012/11/amazon-redshift-the-new-aws-data-warehouse.html
[2] http://blog.cloudera.com/blog/2012/10/cloudera-impala-real-time-queries-in-apache-hadoop-for-real/
[3] https://github.com/cloudera/impala
[4] http://incubator.apache.org/drill/
[5] http://www.slideshare.net/amundtveit/mapreduce-algorithms
[6] http://randomwalker.info/
[7] http://arvindn.livejournal.com/116137.html
[8] https://github.com/Yelp/mrjob
[9] http://instagram-engineering.tumblr.com/post/13649370142/what-powers-instagram-hundreds-of-instances-dozens-of
[10] http://ontwik.com/python/disqus-scaling-the-world%E2%80%99s-largest-django-application/
[11] https://blog.brainsik.net/2009/why-reddit-uses-python
[12] http://www.quora.com/Why-did-Pinterest-founders-use-Python
[13] http://www.quora.com/Quora-Infrastructure/Why-did-Quora-choose-Python-for-its-development
[14] http://www.python.org/about/quotes/
[15] http://docs.aws.amazon.com/redshift/latest/gsg/redshift-gsg.pdf
[16] http://redshiftuser.wordpress.com/2013/01/07/using-boto-to-load-data-into-aws-redshift/
[17] http://docs.pythonboto.org/en/latest/
[18] https://atbrox.com/2009/10/03/hadoop-world-2009-notes-from-application-session/
[19] http://robklopp.wordpress.com/2012/11/15/priceperformance-of-hana-exadata-teradata-and-greenplum/
Posted in analytics, cloud computing, Hadoop and Mapreduce | Tagged , , , , | 5 Comments

Mapreduce Algorithms – Presentation held at O’Reilly Strata Conference

My presentation held at O’Reilly Strata Conference in London, UK, October 1st 2012

Best regards,
Amund Tveit

Posted in cloud computing | Leave a comment

Atbrox @ O’Reilly Strata Conference in London

Atbrox is participating and holding a Hadoop/Mapreduce algorithm related presentation at the O’Reilly Strata Conference in London October 1st and 2nd. If you are there and would like to meet Atbrox send an email to info@atbrox.com


Best regards,
Amund Tveit

Posted in big data, cloud computing | Leave a comment

A large-scale in-memory storage example – social network data

This posting is a follow-up to the large-scale low-latency (RAM-based) storage related price estimates in my previous posting Main takeaways from Accel’s Big Data Conference.

Assume you were to store and index large amounts of social network updates in-memory, e.g. tweets.

1) fetch some tweets

curl https://stream.twitter.com/1/statuses/sample.json?delimited=length -uAnyTwitterUser:Password > yourfilename

2) gather some stats about tweets

import json
import zlib

all_tokens = []
num_kept = 0
uncompressed_lengths = []
compressed_lengths = []
num_tokens_per_tweet = []
num_unique_tokens_per_tweet = []
num_kept_tweets = 0
all_tokens = []

for line in file('yourfilename'):
    # skip non-json lines returned by APIs (lengths)
    if not line.startswith(&amp;quot;{&amp;quot;):
        continue

    jline = json.loads(line)

    text = jline.get(&amp;quot;text&amp;quot;, &amp;quot; &amp;quot;).lower()

    # skips - for simplicity - tweets that can't be space-tokenized
    if not &amp;quot; &amp;quot; in text:
        continue

    # tweets with metadata
    uncompressed_lengths.append(len(line))
    compressed_lengths.append(len(zlib.compress(line)))

    # token calculations
    tokens = text.split(&amp;quot; &amp;quot;)
    num_tokens_per_tweet.append(len(tokens))
    num_unique_tokens_per_tweet.append(len(set(tokens)))
    token_lengths = [len(token) for token in tokens]
    all_tokens.extend(token_lengths)

    num_kept_tweets += 1

avg_uncompressed_length = (sum(uncompressed_lengths)+0.0)/num_kept_tweets
avg_compressed_length = (sum(compressed_lengths)+0.0)/num_kept_tweets
avg_num_tokens = (sum(num_tokens_per_tweet)+0.0)/num_kept_tweets
avg_num_unique_tokens = (sum(num_unique_tokens_per_tweet)+0.0)/num_kept_tweets
avg_token_length = (sum(all_tokens)+0.0)/len(all_tokens)

print &amp;quot;average uncompressed length = &amp;quot;, avg_uncompressed_length
print &amp;quot;average compressed length = &amp;quot;, avg_compressed_length
print &amp;quot;average num tokens = &amp;quot;, avg_num_tokens
print &amp;quot;average num unique tokens = &amp;quot;, avg_num_unique_tokens
print &amp;quot;average token length = &amp;quot;, avg_token_length
print &amp;quot;number of tweets = &amp;quot;, num_kept_tweets

Output for my small random tweet sample

average uncompressed length =  2099.60084926
average compressed length =  848.08492569
average num tokens =  8.91507430998
average num unique tokens =  8.33121019108
average token length =  5.44582043344
number of tweets =  471

Calculate based on published amounts of tweets – 340M tweets per day, ref: thenextweb.

num_tweets_per_day = 340000000
one_gigabyte = 1024*1024*1024
keysize = 64/8 # 64 bit keys

hash_overhead = 2.0/8 # 2 bit overhead, assuming memory-efficient hashtable

storage_per_day_in_gigabytes = num_tweets_per_day*avg_compressed_length/one_gigabyte + num_tweets_per_day*(keysize+hash_overhead)/one_gigabyte

ram_cost_kUSD_per_petabyte_month = 1197
ram_cost_kUSD_per_terabyte_month = ram_cost_kUSD_per_petabyte_month/1000.0
ram_cost_USD_per_terabyte_day = 1000*ram_cost_kUSD_per_terabyte_month/31

storage_per_day_in_terabytes = storage_per_day_in_gigabytes/1024.0
storage_per_week_in_terabytes = 7*storage_per_day_in_terabytes
storage_per_month_in_terabytes = 31*storage_per_day_in_terabytes
storage_per_year_in_terabytes = 365*storage_per_day_in_terabytes

print &amp;quot;storage per day in TB = %f - RAM-cost (per day) %f USD&amp;quot; % (storage_per_day_in_terabytes, storage_per_day_in_terabytes*ram_cost_USD_per_terabyte_day)
print &amp;quot;storage per week in TB = %d - RAM-cost (per day) %f kUSD&amp;quot; % (storage_per_week_in_terabytes, 7*storage_per_day_in_terabytes*ram_cost_USD_per_terabyte_day/1000)
print &amp;quot;storage per month in TB = %d - RAM-cost (per day) %f kUSD - RAM-cost (per year) %f Million USD&amp;quot; % (storage_per_month_in_terabytes, storage_per_month_in_terabytes*ram_cost_USD_per_terabyte_day/1000, 365*storage_per_month_in_terabytes*ram_cost_USD_per_terabyte_day/(1000*1000))
print &amp;quot;storage per year in TB = %d - RAM cost (per day) %f kUSD - RAM cost (per year) %f Million USD&amp;quot; % (storage_per_year_in_terabytes, storage_per_year_in_terabytes*ram_cost_USD_per_terabyte_day/1000, storage_per_year_in_terabytes*ram_cost_USD_per_terabyte_day/(1000*1000)*365)

Output (based on estimates from my small random tweet sample)

storage per day in TB = 0.264803 - RAM-cost (per day) 10.224809 USD
storage per week in TB = 1 - RAM-cost (per day) 0.071574 kUSD
storage per month in TB = 8 - RAM-cost (per day) 0.316969 kUSD - RAM-cost (per year) 0.115694 Million USD
storage per year in TB = 96 - RAM cost (per day) 3.732055 kUSD - RAM cost (per year) 1.362200 Million USD

3. Index calculations (upper bound)

# (extremely naive/stupid/easy-to-estimate-with) assumptions:
#   see e.g. http://cis.poly.edu/~hyan/sigIR-position.pdf for more realistic representations
# 1) all the unique terms of all single tweets does not occur in other tweets
# 2) there are now new terms from one day to another
#    i.e. the posting list per term increases in average by 1 (64 bit tweet id) every day)
# 3) the posting lists are not compressed, i.e. storing 64 bit per list entry
# 4) token themselves are keys
# 5) no ranking/metadata/ngrams etc. for the index
token_key_overhead = 2.0/8
num_tokens_in_index = num_tweets_per_day*avg_num_unique_tokens

# each tweet provides an update to avg_num_unique_tokens entries in index

key_contribution = num_tokens_in_index*(avg_token_length + token_key_overhead)

index_size_per_day = key_contribution + num_tweets_per_day*avg_num_unique_tokens*64/8
index_size_per_week = key_contribution + num_tweets_per_day*avg_num_unique_tokens*7*64/8
index_size_per_month = key_contribution + num_tweets_per_day*avg_num_unique_tokens*31*64/8
index_size_per_year = key_contribution + num_tweets_per_day*avg_num_unique_tokens*365*64/8

index_size_per_day_in_terabytes = index_size_per_day/(1024*1024*1024)
index_size_per_week_in_terabytes = index_size_per_week/(1024*1024*1024)
index_size_per_month_in_terabytes = index_size_per_month/(1024*1024*1024)
index_size_per_year_in_terabytes = index_size_per_year/(1024*1024*1024)

# assuming slightly better encoding of posting lists, e.g. average of 1 byte per entry would give
better_encoded = index_size_per_year_in_terabytes/8

print &amp;quot;index size per week in terabytes = %f - RAM-cost (per day) %f kUSD&amp;quot; % (index_size_per_week_in_terabytes, index_size_per_week_in_terabytes*ram_cost_USD_per_terabyte_day/1000)
print &amp;quot;index size per month in terabytes = %f - RAM-cost (per day) %f kUSD&amp;quot; % (index_size_per_month_in_terabytes, index_size_per_month_in_terabytes*ram_cost_USD_per_terabyte_day/1000)
print &amp;quot;index size per year in terabytes = %f - RAM-cost (per day) %f kUSD&amp;quot; % (index_size_per_year_in_terabytes, index_size_per_year_in_terabytes*ram_cost_USD_per_terabyte_day/1000)

print &amp;quot;index size per year in terabytes (better encoding) = %f - RAM-cost (per day) %f kUSD&amp;quot; % (better_encoded, better_encoded*ram_cost_USD_per_terabyte_day/1000)

Index estimate outputs

index size per week in terabytes = 162.758202 - RAM-cost (per day) 6.284567 kUSD
index size per month in terabytes = 669.268602 - RAM-cost (per day) 25.842404 kUSD
index size per year in terabytes = 7718.205009 - RAM-cost (per day) 298.022303 kUSD
index size per year in terabytes (better encoding) = 964.775626 - RAM-cost (per day) 37.252788 kUSD

Conclusion
Keeping 1 year worth of tweets (including metadata) and (a crude) index of them in-memory is costly, but not too bad. I.e. 1.36 Million USD to keep 1 years worth of tweets (124 billion tweets) for 1 year in an (distributed) in-memory hashtable (or the same amount of tweets stored in the same hashtable for one day costs approximately 3732 USD). The index size estimates are very rough (check out this paper for more realistic representations). The energy costs (to maintain and refresh the RAM) would add between 5-25% additional costs (see comments on previous blog post).

Q: So, is it time to reconsider using hard drives and SSDs and consider going for RAM instead
A: yes, at least consider it and combine with Hadoop. Check out Stanford’s RAMCloud project, and their paper: The Case for RAMClouds:
Scalable High-Performance Storage Entirely in DRAM
. There is still plenty of room for innovation for very-large-scale in-memory systems – there are some commercial vendors support systems with low-terabyte amounts of RAM (e.g. Teradata and Exalytics), but no (easily) available open source or commercial software support Petabyte-size RAM amounts.

On a related note:

disclaimer: this posting have quite a few numbers, so the likelihood of errors is > 0, please let me know if you spot one.

Interested in large-scale in-memory key-value stores?
Check out atbrhttp://github.com/atbrox/atbr

Source code for this posting?
https://github.com/atbrox/atbr/blob/master/blogposts/tweet_in_memory.py

Best regards,

Amund Tveit, co-founder of Atbrox

Posted in in-memory, information retrieval, infrastructure, RAM | Leave a comment